记得有人说过,写不写测试代码是判断一个开发者是否成熟的标志。良好的测试代码能够让程序代码更健壮,使重构更加方便。虽然Objective-C是一种编译语言,但是在Xcode的帮助下,做测试和测试驱动开发(Test Driven Development, TDD)也非常方便。苹果官方有一个关于如何做为项目增加测试支持的文档,不过iOS 4.3的文档包的的该文档已经比较老了,如果你是付费iOS开发者,那么可以看看iOS 5.0的文档包的的该文档,已经更新为Xcode 4的教程了。
iOS的测试分两种,一种是逻辑测试(Logic Tests);另一种是程序测试(Application Tests)。逻辑测试主要是用来测试模块的业务逻辑的;程序测试则是测试模块在整个应用程序中的行为是否正确。逻辑测试类似单元测试;而程序测试则类似集成测试。个人感觉,逻辑测试比较适合测试模型代码;而应用程序测试则比较适合测试控制器和视图代码,考虑到视图在iOS开发中主要是通过Interface Builder来实现,因此,应用测试实际上就是测试控制器代码的。
下面,简单的讲一下如何设置项目支持单元测试。我们要在Xcode中为项目建立两种测试的Target。
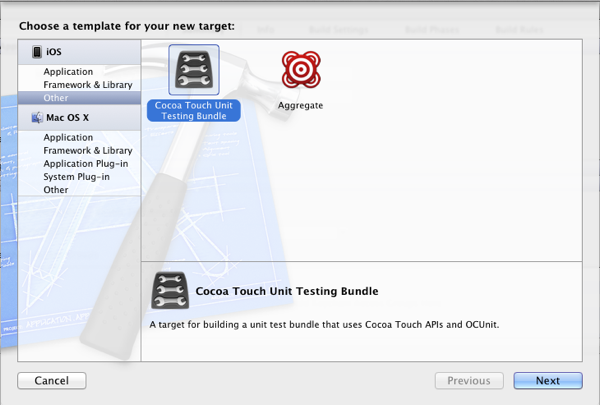
首先,打开“File” - “New” - “New Target…”。这时,选择iOS大标签下面的“Others”小标签,里面有一个“Cocoa Touch Unit Testing Bundle”。选中它,点击“Next”。(如下图所示)
在下一页里,填入测试的名字。我们现在要建的是逻辑测试,虽然名字可以随意,不过,我这里把它命名为MyTestAppLogicTests。Project当然是选择当前的项目。(如下图所示)

点击“Finish”完成。这时,在Project设置的面板里就会增加一个新的Logic Tests的Target。
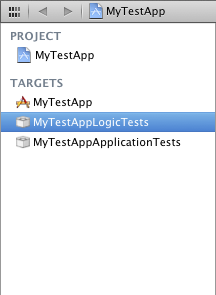
同样的方法建立一个程序测试的Target,命名为MyTestAppApplicationTests。
然后开始对两个Target进行配置。
首先是逻辑测试。在编译设置的标签下,选择All,然后搜索:
- ios deployment target,如果显示为加粗,则选中后按下Delete键。
- bundle loader,如果显示为加粗,则选中后按下Delete键。
- test host,如果显示为加粗,则选中后按下Delete键。

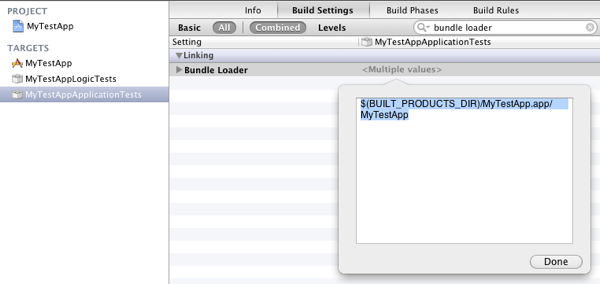
然后是程序测试。在编译设置的标签下,选择All,然后搜索:
- ios deployment target,如果显示为加粗,则选中后按下Delete键。
- bundle loader,设置值为
$(BUILT_PRODUCTS_DIR)/APP_NAME.app/APP_NAME。APP_NAME是程序的名字,比如这个例子里是MyTestApp
- test host,设置值为
$(BUNDLE_LOADER)。
设置完成之后,我们就可以开始试着编译一下,看看配置有没有成功。在Xcode 4的工具条的Scheme部分,选择其中一个测试,以及运行测试的设备,如“iPhone 4.3 Simulator”。然后点击菜单“Project” - “Test”,或按下cmd - u。
因为测试bundle的代码模版里包含一个不能通过的测试例。如果你看到一个不是编译错误的问题,基本上就是配置成功了。分别试一下逻辑测试的配置和程序测试的配置,看看是否都成功。
配置成功后,就可以开始写测试代码了。
首先还是先开看看逻辑测试代码的写法。在MyTestAppLogicTests的类中,加入下面这些简单的测试代码。我们这里要测试的是一个名为MySillyAdd的类。这个类只有一个方法,-addNumberA: ToNumberB:,返回两个整数的和:
1
2
3
4
5
6
7
8
9
10
11
12
13
14
15
16
17
18
19
20
21
22
23
24
25
26
27
28
29
30
31
32
33
34
35
36
37
38
39
40
41
42
43
44
45
46
| //
// MyTestAppLogicTests.h
//
#import <SenTestingKit/SenTestingKit.h>
#import "MySillyAdd.h"
@interface MyTestAppLogicTests : SenTestCase {
MySillyAdd *mySillyAdd;
}
@end
//
// MyTestAppLogicTests.m
//
#import "MyTestAppLogicTests.h"
@implementation MyTestAppLogicTests
# 运行测试例之前的设置
- (void)setUp
{
[super setUp];
// Set-up code here.
mySillyAdd = [[MySillyAdd alloc] init];
STAssertNotNil(mySillyAdd, @"Can not create MySillyAdd object.");
}
# 运行测试例之后的清理现场
- (void)tearDown
{
// Tear-down code here.
[mySillyAdd release];
[super tearDown];
}
# 测试例,都是方法名为:testXXXX,用ST...的Macro来验证测试结果。
- (void)testAddOneToOne {
NSInteger result = [mySillyAdd addNumberA:1 ToNumberB:1];
STAssertEquals(2, 2, @"Expect 2 for result, but got %d", result);
}
@end
|
程序测试的与逻辑测试的区别在于需要在-setUp:方法中获取应用程序的环境。示例代码如下:
1
2
3
4
5
6
7
8
9
10
11
12
13
14
15
16
17
18
19
20
21
22
23
24
25
26
27
28
29
30
31
32
33
34
35
36
37
38
39
40
41
42
43
44
45
46
47
48
49
50
51
52
53
54
55
56
57
58
59
60
61
| //
// MyTestAppApplicationTests.h
//
#import <SenTestingKit/SenTestingKit.h>
#import <UIKit/UIKit.h>
#import "MyTestAppViewController.h"
#import "MyTestAppAppDelegate.h"
@interface MyTestAppApplicationTests : SenTestCase {
MyTestAppViewController *vc;
MyTestAppAppDelegate *appDelegate;
UIView *view;
}
- (void)testAddOneToOne;
@end
//
// MyTestAppApplicationTests.m
//
#import "MyTestAppApplicationTests.h"
@implementation MyTestAppApplicationTests
# 设置测试环境,获取应用程序实例。
- (void)setUp
{
[super setUp];
// Set-up code here.
appDelegate = [[UIApplication sharedApplication] delegate];
vc = (MyTestAppViewController *)appDelegate.window.rootViewController;
view = vc.view;
}
- (void)tearDown
{
// Tear-down code here.
[super tearDown];
}
- (void) testAppDelegate {
STAssertNotNil(appDelegate, @"Cannot find the application delegate");
}
# 测试1+1的结果是不是等于2
- (void)testAddOneToOne {
vc.numberA.text = @"1";
vc.numberB.text = @"1";
[vc calc:[view viewWithTag:3]]; // The Tag Button;
NSString *resultString = vc.resultLabel.text;
STAssertEqualObjects(@"2", resultString, @"Expect 2 for result, but got %@", resultString);
}
@end
|
上例测试的是MyTestAppViewController中的-calc:方法。我们先来测试一个-calc:的实现:
1
2
3
4
5
6
| - (IBAction)calc:(id)sender {
NSInteger a = [self.numberA.text integerValue];
NSInteger b = [self.numberB.text integerValue];
self.resultLabel.text = [NSString stringWithFormat:@"%d", a + b];
}
|
运行测试,我们就可以看到这个测试例顺利通过。
然后,我们对上述方法进行重构,用我们的MySillyAdd类来实现1+1。再次运行测试例。
1
2
3
4
5
6
| - (IBAction)calc:(id)sender {
NSInteger a = [self.numberA.text integerValue];
NSInteger b = [self.numberB.text integerValue];
self.resultLabel.text = [NSString stringWithFormat:@"%d", [mySillyAdd addNumberA:a ToNumberB:b]];
}
|
在MySillyAdd中,-addNumberA:ToNumberB:的实现如下:
1
2
3
| - (NSInteger)addNumberA:(NSInteger)theNumberA ToNumberB:(NSInteger)theNumberB {
return theNumberA + theNumberB;
}
|
测试运行结果是顺利通过。虽然这个例子非常傻,不过基本上描述了写测试的大致过程。本文的示例代码在这里,有兴趣的可以看看。
通过这个简单的例子,我们了解了如何在iOS开发中加入测试,以后,我们就能通过编写测试代码来使我们写的代码更加健壮了。
最后附上逻辑测试和程序测试的输出。
逻辑测试
1
2
3
4
5
6
7
8
9
| Test Suite '/Users/venj/Library/Developer/Xcode/DerivedData/MyTestApp-cyecpqfpcbcdlcgizexbrsjxlngw/Build/Products/Debug-iphonesimulator/MyTestAppLogicTests.octest(Tests)' started at 2011-08-17 07:41:15 +0000
Test Suite 'MyTestAppLogicTests' started at 2011-08-17 07:41:15 +0000
Test Case '-[MyTestAppLogicTests testAddOneToOne]' started.
Test Case '-[MyTestAppLogicTests testAddOneToOne]' passed (0.000 seconds).
Test Suite 'MyTestAppLogicTests' finished at 2011-08-17 07:41:15 +0000.
Executed 1 test, with 0 failures (0 unexpected) in 0.000 (0.001) seconds
Test Suite '/Users/venj/Library/Developer/Xcode/DerivedData/MyTestApp-cyecpqfpcbcdlcgizexbrsjxlngw/Build/Products/Debug-iphonesimulator/MyTestAppLogicTests.octest(Tests)' finished at 2011-08-17 07:41:15 +0000.
Executed 1 test, with 0 failures (0 unexpected) in 0.000 (0.002) seconds
|
程序测试
1
2
3
4
5
6
7
8
9
10
11
12
13
14
15
16
17
18
19
20
21
22
23
| Test Suite 'All tests' started at 2011-08-17 07:43:20 +0000
Test Suite '/Users/venj/Library/Developer/Xcode/DerivedData/MyTestApp-cyecpqfpcbcdlcgizexbrsjxlngw/Build/Products/Debug-iphonesimulator/MyTestAppApplicationTests.octest(Tests)' started at 2011-08-17 07:43:20 +0000
Test Suite 'MyTestAppApplicationTests' started at 2011-08-17 07:43:20 +0000
Test Case '-[MyTestAppApplicationTests testAddOneToOne]' started.
Test Case '-[MyTestAppApplicationTests testAddOneToOne]' passed (0.001 seconds).
Test Case '-[MyTestAppApplicationTests testAppDelegate]' started.
Test Case '-[MyTestAppApplicationTests testAppDelegate]' passed (0.001 seconds).
Test Suite 'MyTestAppApplicationTests' finished at 2011-08-17 07:43:20 +0000.
Executed 2 tests, with 0 failures (0 unexpected) in 0.002 (0.004) seconds
Test Suite '/Users/venj/Library/Developer/Xcode/DerivedData/MyTestApp-cyecpqfpcbcdlcgizexbrsjxlngw/Build/Products/Debug-iphonesimulator/MyTestAppApplicationTests.octest(Tests)' finished at 2011-08-17 07:43:20 +0000.
Executed 2 tests, with 0 failures (0 unexpected) in 0.002 (0.007) seconds
Test Suite '/Developer/Platforms/iPhoneSimulator.platform/Developer/SDKs/iPhoneSimulator4.3.sdk/Developer/Library/Frameworks/SenTestingKit.framework(Tests)' started at 2011-08-17 07:43:20 +0000
Test Suite 'SenInterfaceTestCase' started at 2011-08-17 07:43:20 +0000
Test Suite 'SenInterfaceTestCase' finished at 2011-08-17 07:43:20 +0000.
Executed 0 tests, with 0 failures (0 unexpected) in 0.000 (0.001) seconds
Test Suite '/Developer/Platforms/iPhoneSimulator.platform/Developer/SDKs/iPhoneSimulator4.3.sdk/Developer/Library/Frameworks/SenTestingKit.framework(Tests)' finished at 2011-08-17 07:43:20 +0000.
Executed 0 tests, with 0 failures (0 unexpected) in 0.000 (0.003) seconds
Test Suite 'All tests' finished at 2011-08-17 07:43:20 +0000.
Executed 2 tests, with 0 failures (0 unexpected) in 0.002 (0.086) seconds
|
(全文完)